It looks like you are using an ad blocker. That's okay. Who doesn't? But without advertising revenue, we can't keep making this site awesome. Click the link below for instructions on disabling adblock.
Welcome to the Newschoolers forums! You may read the forums as a guest, however you must be a registered member to post.
Register to become a member today!
Official Ski Pressing/Shaping/Building/Constructing Thread
All of us have thought about building your own shit at one time or another, but how many of you actually have? This thread will be dedicated to those who actually build your own gear from scratch, surely there are some of you on NS. Now I can't contribute to this thread much because I've never built anything and I only have a small amount of time working with fiberglass, but would sure love to see some info from you dudes who actually do, whether you build in your basement, or for a living. So if you can legitimately contribute please do.
Took out the Street Smart for the first time today and found out that wood bases work great. They skied really well, and are way faster than I thought they would. Best part at high speeds they are really stable and hold an edge like any high end park ski. Havent brought them in the park yet going to ski on them for a while to get a really good feel for them as well wear out the edges a little bit. Overall I'm excited on how they came out and might start making all my skis with wood bases.
Just sanded them smooth, used spar finish and hot wax.
Here they are in action.
street smart from Smrt on Vimeo.
The snow cover right now is thin in places and a few rocks made some dents in the bases they are a little to soft. Next time going to go with a harder wood.
Sometimes the site doesn't load for me, I have no idea why.
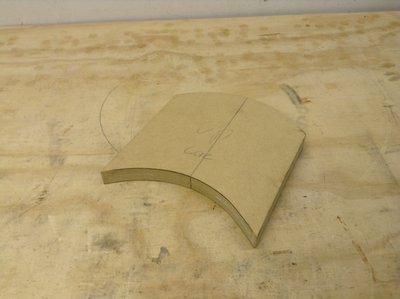
Here's my old tipspacer jig:
It was pretty good but the joint it created wasn't laser precise, and it was awkward to clamp it onto the core or the tipspacer. Because of those reasons, I whipped up this new one:
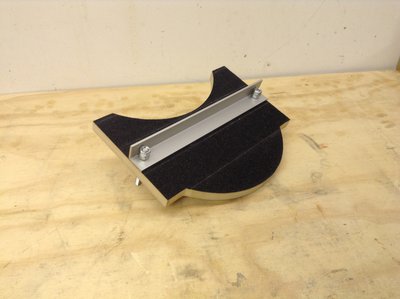
I covered the bottom of the jig and the aluminium angle clamp with grip tape so it doesn't slide one bit.
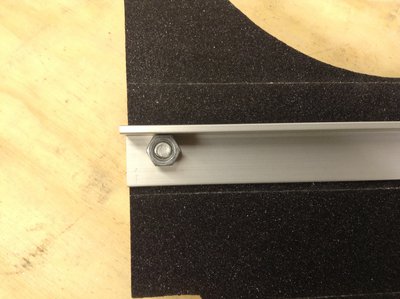
The aluminium angle is drilled so that the flats of the nuts are held against the vertical portion. No tools needed! Attention to small details like this when designing things make a big difference when it's in use.
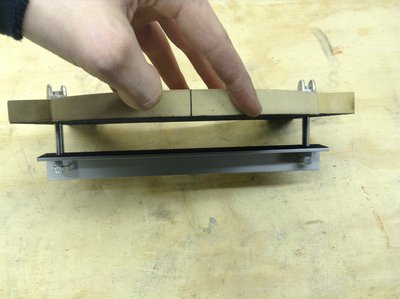
This is the clamp open. It will be able to clamp onto both the core and the tipspacer, up to 200MM wide. If I'm ever building skis that big, I've moved out west and you may never hear from me again because I'm living the dream.
I was mega careful when trimming it out and hand sanded it to what I feel like is a near perfect finish. Just tracing and comparing some lines from the front and rear of the jig onto a piece of paper, they seemed to be quite tight. Hopefully that's the result it will actually produce! Down the line when I find a machine shop I like to deal with, I'd imagine I'll get one of these CNC'd for the tightest of tight joints.
joelskiwhat do you guys use to protect the mold from epoxy, the painters plastic/ double sided tape method on skibuilders.com seems pretty sketchy
mold release or parchment paper/spray glue. are you using an aluminum sheet? parchment paper seems like the best option to me, as I worry about mold release causing surface imperfections.
loganimlachmold release or parchment paper/spray glue. are you using an aluminum sheet? parchment paper seems like the best option to me, as I worry about mold release causing surface imperfections.
For my setup I use 3 initial coats of mould release wax on my cassette sheets, then a layer of PVA rolled on. Then I re-wax and PVA as necessary. And Logan, I've had some thick ugly coats of wax on my cassttes before when I was having cleanup issues, and luckily that stuff is all soft and pliable enough that it will just smush under pressing loads instead of causing and indentations into the topsheet. The bigger issue here is making sure your cassette is clean because this stuff is tacky enough to hold dirt. I never set my cassettes face down on the ground, only ever on edge.
NinetyFourFor my setup I use 3 initial coats of mould release wax on my cassette sheets, then a layer of PVA rolled on. Then I re-wax and PVA as necessary. And Logan, I've had some thick ugly coats of wax on my cassttes before when I was having cleanup issues, and luckily that stuff is all soft and pliable enough that it will just smush under pressing loads instead of causing and indentations into the topsheet. The bigger issue here is making sure your cassette is clean because this stuff is tacky enough to hold dirt. I never set my cassettes face down on the ground, only ever on edge.
thanks guys, after you apply either the mold release or the parchment paper how do you attach the ski base to the bottom mold? would double sided tape work or would it leave indentations in the base? i intend to nail the core to the mold as suggested on skibuilders how to guide, would the nails allow some epoxy to leak through and harden onto the mold? one last question, could you use the same contact paper used to cover the base/topsheet? I am going to do a few tests with cutoff materials and scrap , and i have a bit of extra contact paper so i will try that either way,
joelskithanks guys, after you apply either the mold release or the parchment paper how do you attach the ski base to the bottom mold? would double sided tape work or would it leave indentations in the base? i intend to nail the core to the mold as suggested on skibuilders how to guide, would the nails allow some epoxy to leak through and harden onto the mold? one last question, could you use the same contact paper used to cover the base/topsheet? I am going to do a few tests with cutoff materials and scrap , and i have a bit of extra contact paper so i will try that either way,
thanks
i use contact paper to cover the base and topsheet. my method is to spray glue the base to the parchment paper.
What's up guys? this upcoming spring I am doing my senior project for my school, and I plan on designing and building a pair of skis. I will be doing it over the course of May, when I am out of school. I will have to log 75 hours of work over the course of 3 weeks. I plan on doing a significant amount of research and planning through sites like newschoolers and skibuilders.com over the next coming months before I start. I will be carrying out my project in the garage of my house along with help from my dad. I will most likely be making a vacuum press unless I can find someone in the RI/MA area that has a press i could use.
Here's the problem. I need a mentor for the project. Someone that has a decent amount of experience in building skis. The communication would most likely be over the phone, and through pictures of the skis online, unless I can find someone that lives within a couple hours from me. I would have to do a quick email interview with you if you volunteered, and you would just have to talk to my teacher over the phone. I wouldn't need a lot of your time, I would just send emails and check in occasionally. I am looking for any help i can get. If you think you would be able to be my mentor or know someone that might be able to help me please let me know.
s-handNo. Building a pair will only cost you slightly more than a single ski. Maybe none at all.
depends on what kind of press your making, if your making pneumatic it could be cheeper to do one at a time because you only need half the metal, one length of fire hose, and half the mold to make your press. However its still better to make a press wide enough for two skis so that when you do get to a decent level of durability you can switch to pressing both at the same time and both skis within a pair will be more consistent with each other. Also remember that when pressing only one ski you will have more time to layup properly because you will have half the amount of epoxy to mix and spread over half the number of layers. You will also improve your technique faster building one ski at a time because you will get twice as much practice per pair. I got a one ski width pneumatic press for free so i am stuck until i get to college and have the tools available to make a new press.
https://vimeo.com/51577170 Alright, so obviously these arent skis but i think this is really cool and basically uses the same basics as ski construction. In the video on the link you cant see the whole process but it was on the show "How It's Made". Basically this guy collects broken skateboard, takes off the tape and graphic, epoxies them all together, and then squeezes the crap out of em with some jack presses. Then he has a great big band saw that cuts vertical slices that he cuts into new board shapes. The main part you cant see is him using fiberglass as a top sheet. Since you don't want grip tape to cover the cool pattern he epoxies the fiberglass and while its still a bit wet he sprinkles clear recycled glass bits and lightly presses them in. I figured that anyone on here who was already ski building would only need to drive around to skate shops and get like 20 boards. Anyways, seems like a dope project and someone should try it out.
Well I seem to be a year or two behind the majority of people on this thread...but a late start is better than no start
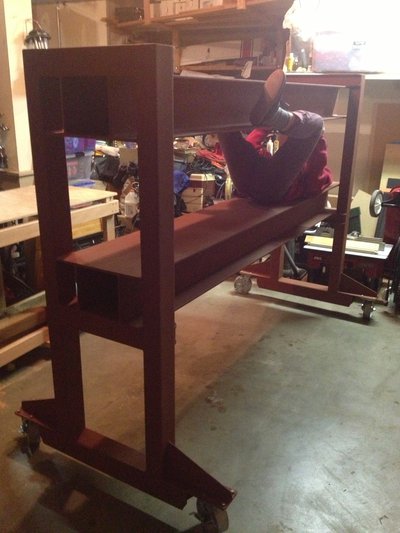
After this being just a dream for years....and cleaning out the garage numerous times to get ready for nothing...something is happening!
I finally found someone who was willing to help me out and who (supposedly) had the metal on craigslist!
After we get into it, it turns out he didn't have enough wide flange in the right size. One option was to use 8 12" beams; 4 on top, 4 on bottom, but getting those level would be a nightmare and we ended up getting the original 8" wide flange. Cheaper than I originally estimated too! The final product was a mix of the design I had....some help from google images...and his imagination.
we are quite happy about our delivery!
my tiny workspace in my parents' garage that they allow me to use...they were also kind enough to let this hunk of metal live here
one weld. all the way. perfectly ground. perfectly level and perfectly flat. This portion was payed for with taquitos & fresh guac
and one last one of course..I can't help myself but post it
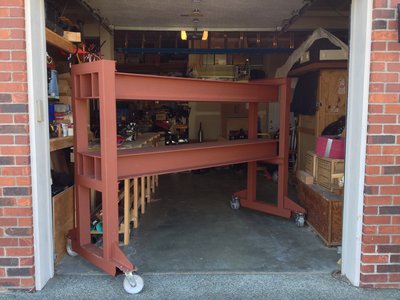
It's a breeze to roll as well....even on that slippery smooth cement
I designed the press years ago when I was really really into this and it somewhat took a break for monetary reasons...BUT NOW I'M BACK. I left the welder with the plans, we ended up buying the wide flange from a steel supplier and to save both of us money, he used whatever metal he had laying around to finish the rest of it.
I'm set to pick up aluminum for the cat track from another supplier whenever I can make the drive there..hopefully this week...almost 170' of tubing to fit in the back of an outback..but it can be done! I have one firehose that is unfortunately a double jacket nylon one and I am a bit skeptical about using, but the fire department was kind enough to let me have 20' of it...this was also years ago, so it has been sitting there for quite a while. On the brighter side, (craigslist to the rescue again!) I found a connection for 25' of 300psi 5" rubber supply hose for $25! Tested & all, lets pray there are no little sneaky holes.
I totally had this fall out of my threads, but it's back where it should be now. I'll read back some and see if I can answer up on any questions. And the press is looking good dude! Aren't they just beasts of beauty, like an elephant or something?
So stoked on this! Last weekend I built a workbench from scratch to start ski building, now I'm moving on to the router setup for core profiling. I'm probably going to go vac press, because I can't weld and it just seems a ton easier and less dangerous hahaha.
I'll update you guys on my progress as I go, this thread has been amazingly helpful so far guys! Massive thanks to everyone who has taken the time to make frequent updates. I spent a solid 6 or 7 hours reading through it all and planning my own setup.
Just like an elephant! It's size is just magnificent, its like playing with toys as a toddler but now they are life size! I went down through the rabbit hole and its a dream come true!
I would agree that a vacuum press seems a lot safer, but thinking about just setting up my bladder and pressing...the reality of anything happening seems quite real, but the severity of what will happen seems quite slim. With a press as bulky as NinetyFours, or like mine or whoever has a similar press, if one of the welds DOES fail, the other welds are more than enough to hold it together. In addition, that metal is going NOWHERE with a firehose inflated to AT MOST 200psi...which is way more than enough. If anything was to happen, you might just have warping or a piece of metal fall down....but these things are burly.
Excited to see where the vacuum press takes you! It seems a lot easier to make some funk shapes or 3d skis...for example the Völkl V Werks series where they only have a full thickness ski in the binding area and in the middle sections in front and back. The rest is suuuuper thin.
Alright, so I decided to go ahead and buy a planer instead of a router and I can say now it is amazing! From what I have heard of seen of routers, it seems so much more difficult to profile the core. I had a scrap piece of wood, a little smaller than a pair of skis and I profiled it to size in less than 20 minutes. I'm so stoked on this right now! I'm gonna order my actual materials and get started as soon as I can.
The only thing I noticed is that it is quite hard to regulate how much to take off of the core. With a planer, should I still build rails and a setup for it? I think if I just practice a few more times I should be good. Build on NS!
I have got to say it feels so strange posting this process after you guys have already done it..but it brings me satisfaction, so why not.
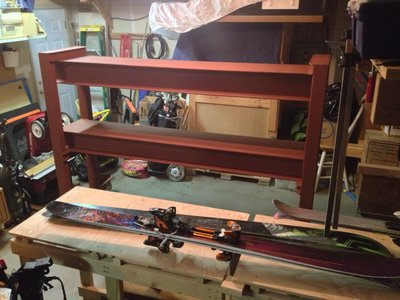
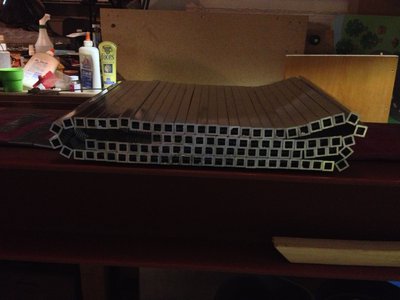
I used 3/4" tubing with 1/8" thick walls..probably overkill, but I'd rather overbuild than under build. I think I bought 170' of tubing which came in 21' tubes. They supplier cut them down to 7' pieces for me which yielded the same amount of pieces, the drop is just in 3-4" pieces instead of a 12" chunk. I cut them into 16" pieces, which is the same width as the "bed" on the press with an 80 tooth 10" carbide tipped blade around 3600 rpm. It feels like cutting through a really really sticky hardwood. No sparks for anyone who hasn't worked with aluminum.
I drilled 1/4" holes (nearly 500....that was a tedious job) about an inch and a half in from the ends, then threaded them with 1/8" steel cable. I originally used 3/32" cable but it was coated and turned out to be a fraction less than 1/4" and kept catching as I threaded and figured it wouldn't let the cat track mold freely enough to the ski underneath. I have the only springs they had down at the hardware store right against the end pieces, followed by a 3/8" washer, and a 3/32" cable clamp. I'm not sure how many pieces I have on there at the moment, but I have a few that are a tad longer which I think I am going to use to put more holes in to suspend the cat track. In the end I calculated between 115 and 120 pieces for close to the longest ski I'd make. I still have an extra tube as well that hasn't been cut up..so I can always make it bigger and/or replace pieces.
Just curious if you guys think I should keep the longer pieces (20" about if I recall) long and distribute them evenly or if I should cut them down to 16" like the rest.
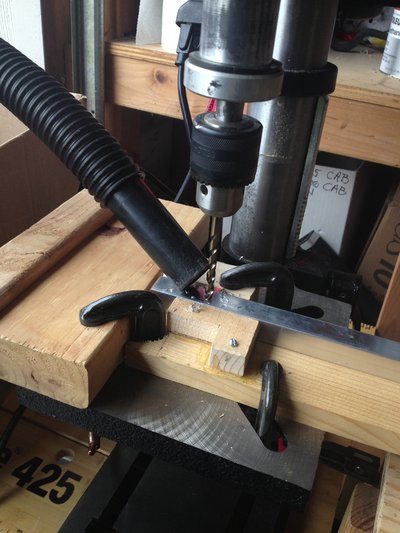
This jig worked like a breeze..a bit crude, but it didn't budge. 1/4" Cobalt infused bit, expensive, but did the job perfectly and is still as sharp as a...whatever is really sharp.
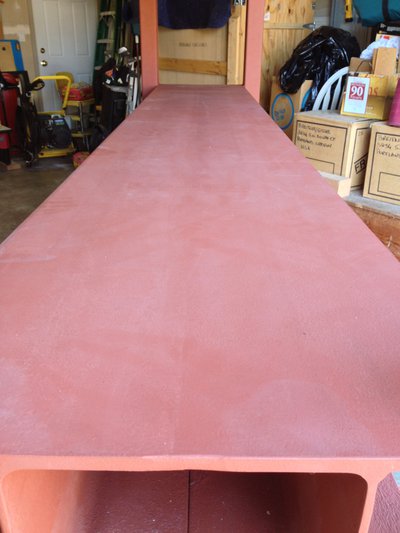
Folded up...boy it's heavy to carry. Something like 60 lbs if I remember correctly.
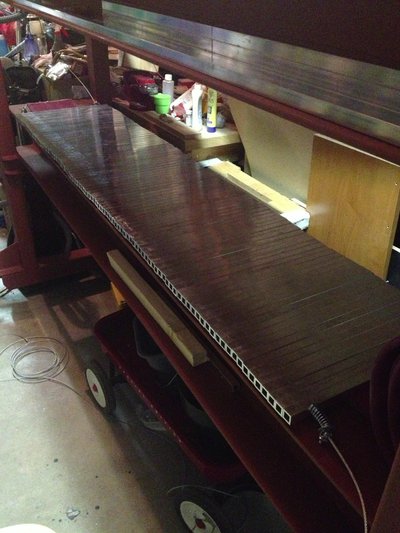
All strung...this whole process was so damn repetitive.
There's a few pieces, that seemed to end up in the MIDDLE, that are bent and I have to replace with straight ones...
I've got one firehose (you can slightly see under the aluminum) but it has a woven nylon outer jacket and is a bit wide, planning to pick up a rubber supply hose on Thursday.
Anyone have tips on cutting & drilling steel angle iron?
Looks good! For drilling heavy steel, a good center punching for the hole, followed by a small pilot, then your final hole size works quite well. Keep your bit cool by lubricating it with either a cutting oil, or just some engine oil if you don't have any. You don't need a whole lot, just a small puddle.
Thanks! Just to stay on the safe side I'm going to wait until I have the new firehose before I do any cutting or drilling. I can't wait to get the first ski in there...It can't happen soon enough
K.BreitI have got to say it feels so strange posting this process after you guys have already done it..but it brings me satisfaction, so why not.
I used 3/4" tubing with 1/8" thick walls..probably overkill, but I'd rather overbuild than under build. I think I bought 170' of tubing which came in 21' tubes. They supplier cut them down to 7' pieces for me which yielded the same amount of pieces, the drop is just in 3-4" pieces instead of a 12" chunk. I cut them into 16" pieces, which is the same width as the "bed" on the press with an 80 tooth 10" carbide tipped blade around 3600 rpm. It feels like cutting through a really really sticky hardwood. No sparks for anyone who hasn't worked with aluminum.
I drilled 1/4" holes (nearly 500....that was a tedious job) about an inch and a half in from the ends, then threaded them with 1/8" steel cable. I originally used 3/32" cable but it was coated and turned out to be a fraction less than 1/4" and kept catching as I threaded and figured it wouldn't let the cat track mold freely enough to the ski underneath. I have the only springs they had down at the hardware store right against the end pieces, followed by a 3/8" washer, and a 3/32" cable clamp. I'm not sure how many pieces I have on there at the moment, but I have a few that are a tad longer which I think I am going to use to put more holes in to suspend the cat track. In the end I calculated between 115 and 120 pieces for close to the longest ski I'd make. I still have an extra tube as well that hasn't been cut up..so I can always make it bigger and/or replace pieces.
Just curious if you guys think I should keep the longer pieces (20" about if I recall) long and distribute them evenly or if I should cut them down to 16" like the rest.
This jig worked like a breeze..a bit crude, but it didn't budge. 1/4" Cobalt infused bit, expensive, but did the job perfectly and is still as sharp as a...whatever is really sharp.
Folded up...boy it's heavy to carry. Something like 60 lbs if I remember correctly.
All strung...this whole process was so damn repetitive.
There's a few pieces, that seemed to end up in the MIDDLE, that are bent and I have to replace with straight ones...
I've got one firehose (you can slightly see under the aluminum) but it has a woven nylon outer jacket and is a bit wide, planning to pick up a rubber supply hose on Thursday.
Anyone have tips on cutting & drilling steel angle iron?
Cheers!
What is the function of the threaded-together aluminum tubes?
s-handWhat is the function of the threaded-together aluminum tubes?
They form a surface in which the pressure from the firehose(s) can be distributed evenly.
On top, two fire hoses will be side by side, this creates two "lines," more accurately rectangle shape, of pressure going lengthwise. Without the aluminum tubing, if there is a ski below that is not centered under one of those rectangles, it will not get even pressure over the entire surface therefore creating weak spots in the skis. Also, any part of the firehose that is touching something else other than the ski, means x amount of pounds per square inch (pressure) is being applied to something else that is NOT the ski.
With the aluminum tubing (cat-track), it is able to transfer the maximum amount of pressure (varies on the surface area of the area where the cat track & fire hose touch, also the psi the firehose is inflated too), to the skis below.
For example, if I inflated the firehoses to 90psi and pressed a ski that was skinnier than the firehose, and the firehose was also pressing on the bottom mold, the ski would be under AT MOST 90psi of pressure. With the cat track, if I press the SAME ski, but under the cat track, the area of the firehose that is touching the cat-track at 90psi, could potentially become more pressure where the cat-track comes into contact with the ski.
It is the same concept as why you lay flat on thin ice instead of stand up on 2 feet, but we are using the physics in the opposite way. Just as why if you step into snow in just boots, you go a lot deeper than if you are standing there on two really fat skis.
x amount of pressure applied to y^2 area (cat-track-firehose contact area) and then the pressure of the y^2 area is transferred to z^2 area (skis). through this process, the pressure is distributed evenly horizontally.
Hope this makes some sense..and I know there are more reasons, but I'm not entirely sure myself what they are.
K.BreitThey form a surface in which the pressure from the firehose(s) can be distributed evenly.
On top, two fire hoses will be side by side, this creates two "lines," more accurately rectangle shape, of pressure going lengthwise. Without the aluminum tubing, if there is a ski below that is not centered under one of those rectangles, it will not get even pressure over the entire surface therefore creating weak spots in the skis. Also, any part of the firehose that is touching something else other than the ski, means x amount of pounds per square inch (pressure) is being applied to something else that is NOT the ski.
With the aluminum tubing (cat-track), it is able to transfer the maximum amount of pressure (varies on the surface area of the area where the cat track & fire hose touch, also the psi the firehose is inflated too), to the skis below.
For example, if I inflated the firehoses to 90psi and pressed a ski that was skinnier than the firehose, and the firehose was also pressing on the bottom mold, the ski would be under AT MOST 90psi of pressure. With the cat track, if I press the SAME ski, but under the cat track, the area of the firehose that is touching the cat-track at 90psi, could potentially become more pressure where the cat-track comes into contact with the ski.
It is the same concept as why you lay flat on thin ice instead of stand up on 2 feet, but we are using the physics in the opposite way. Just as why if you step into snow in just boots, you go a lot deeper than if you are standing there on two really fat skis.
x amount of pressure applied to y^2 area (cat-track-firehose contact area) and then the pressure of the y^2 area is transferred to z^2 area (skis). through this process, the pressure is distributed evenly horizontally.
Hope this makes some sense..and I know there are more reasons, but I'm not entirely sure myself what they are.
That does make sense thanks! So it goes top mold, bladder, cat-track, ski materials in the press?
s-handThat does make sense thanks! So it goes top mold, bladder, cat-track, ski materials in the press?
Yes, although usually on each side of the ski layup is some kind of semi-rigid sheet called a cassette. I run a 20ga steel sheet below the skis and a 0.032" aluminium sheet above. It makes releasing the skis and cleaning up excess hardened resin and glass after easier. It also allows you to layup on something external, then you can slide the cassette into the press mess free. It's more or less like a baking tray for your press, and skis are the cookies.
NinetyFourYes, although usually on each side of the ski layup is some kind of semi-rigid sheet called a cassette. I run a 20ga steel sheet below the skis and a 0.032" aluminium sheet above. It makes releasing the skis and cleaning up excess hardened resin and glass after easier. It also allows you to layup on something external, then you can slide the cassette into the press mess free. It's more or less like a baking tray for your press, and skis are the cookies.
Interesting, thanks. I am hoping to press my first pair of skis this summer. Just trying to get all my ducks in a row
NinetyFourYes, although usually on each side of the ski layup is some kind of semi-rigid sheet called a cassette. I run a 20ga steel sheet below the skis and a 0.032" aluminium sheet above. It makes releasing the skis and cleaning up excess hardened resin and glass after easier. It also allows you to layup on something external, then you can slide the cassette into the press mess free. It's more or less like a baking tray for your press, and skis are the cookies.
since you mentioned cassettes, do you happen to know what alloy of Al you are using? If I recall correctly, 6061 seems to be the easy way to go. Also: why do you use steel for below the skis instead of aluminum? Just curious.
On the same note of cassettes, do you grab a new sheet for each different length and bend in tips/tails to it? I've been trying to wrap my head around this but can't for the life of me figure out what I need to do
K.Breitsince you mentioned cassettes, do you happen to know what alloy of Al you are using? If I recall correctly, 6061 seems to be the easy way to go. Also: why do you use steel for below the skis instead of aluminum? Just curious.
On the same note of cassettes, do you grab a new sheet for each different length and bend in tips/tails to it? I've been trying to wrap my head around this but can't for the life of me figure out what I need to do
Yeah it's 0.032" 6061, I just used it because it was the cheapest. Originally I had used it on both the top and bottom but I switched to the 20ga steel on the bottom for a few reasons. It was stiffer which made for flatter bases, and harder which made it easy to clean any really stuck on pieces of epoxy off whereas the aluminium would scratch and dent easily. However if you're cassettes are really prepped right than they usually just clean off with a blast of compressed air.
Aha whoops, hit reply... For cassettes, I do have multiple sets for every length. I bend them all to match the profile of my mould, and then my ski bases/edges are also bent to sit in the cassette.
NinetyFourYeah it's 0.032" 6061, I just used it because it was the cheapest. Originally I had used it on both the top and bottom but I switched to the 20ga steel on the bottom for a few reasons. It was stiffer which made for flatter bases, and harder which made it easy to clean any really stuck on pieces of epoxy off whereas the aluminium would scratch and dent easily. However if you're cassettes are really prepped right than they usually just clean off with a blast of compressed air.
NinetyFourAha whoops, hit reply... For cassettes, I do have multiple sets for every length. I bend them all to match the profile of my mould, and then my ski bases/edges are also bent to sit in the cassette.
Thank you! I wish I had more time on my hands to work on this. If only that pesky noise ordinance in the neighborhood didn't exist...
This might be a pretty stupid question: Did you clamp the sheet metal onto a table and then just wrench down on the part hanging off the edge to get the bend?
And another comment: I've got a double jacketed nylon fire supply hose. It should seal just fine with the right washers and maybe some 5200 on the inside of the hose, on the rubber/silicone liner. I'm just asking if anyone has had any bad experiences with this type of hose. I assume it should act the exact same, I just have an extra coat of armor on the outside of it. The one thing that puzzles me is if the rubber coated hoses have some amount of stretch to them. Still, my conclusion physics-wise is that it should make no difference.
This summer I want to attempt to make my own pair. What would be the best way to get around the press. As a highschooler, I dont have a ton of cash. I feel like I could probably make my molds tho. Does anyone know where I could use a press in the Denver area?