It looks like you are using an ad blocker. That's okay. Who doesn't? But without advertising revenue, we can't keep making this site awesome. Click the link below for instructions on disabling adblock.
Welcome to the Newschoolers forums! You may read the forums as a guest, however you must be a registered member to post.
Register to become a member today!
Official Ski Pressing/Shaping/Building/Constructing Thread
All of us have thought about building your own shit at one time or another, but how many of you actually have? This thread will be dedicated to those who actually build your own gear from scratch, surely there are some of you on NS. Now I can't contribute to this thread much because I've never built anything and I only have a small amount of time working with fiberglass, but would sure love to see some info from you dudes who actually do, whether you build in your basement, or for a living. So if you can legitimately contribute please do.
CashmereCatAnyone have any advice on how to prevent the core from slipping while in the press?
I'm using core pegs that are glued to the base, then the core slides right over them. Haven't had a single issue yet. I started with three pegs, moved to a two peg setup that I freehand drilled, and now I'm using a jig to perfectly place holes and glue the pegs every time. The pegs are located where the toepiece and heelpiece will lay on the ski. If you do use pegs, be sure to cut them slightly shorter than the core, or else you will have a base and topsheet that are raised up around the peg.
Also working on my first set of sidewall skis when I can find the time. I will admit that it's quite a bit more difficult than having plain overlapping cores, but I think I've got a good process in place to integrate them into the ski now.
If anyone is interest, we have some left over Bcomp material we aren't going to be using anymore, so if anyone wants to pick it up without having to pay out the ass for to have it shipped from europe, let me know.
Ahhhhhhh I'm familiar with the bcomp cores, I thought the "D220" was some sort of composite
NinetyFourI'm using core pegs that are glued to the base, then the core slides right over them. Haven't had a single issue yet. I started with three pegs, moved to a two peg setup that I freehand drilled, and now I'm using a jig to perfectly place holes and glue the pegs every time. The pegs are located where the toepiece and heelpiece will lay on the ski. If you do use pegs, be sure to cut them slightly shorter than the core, or else you will have a base and topsheet that are raised up around the peg.
Also working on my first set of sidewall skis when I can find the time. I will admit that it's quite a bit more difficult than having plain overlapping cores, but I think I've got a good process in place to integrate them into the ski now.
Thank you! That makes more sense to me than the nail thing does for whatever reason.
So recently I've been scouring ski builders and have not yet become a registered user so i will ask my questions here.
What a good core wood for park skis?
How do you attach the tip/tail spacers to the core during layup?
Do you rabbet the bottom of the core or the top of the base for edges?
Do you attach your edges right before layup(i heard the base can warp)?
Might have more later...
WiscoSkiingSo recently I've been scouring ski builders and have not yet become a registered user so i will ask my questions here.
What a good core wood for park skis?
How do you attach the tip/tail spacers to the core during layup?
Do you rabbet the bottom of the core or the top of the base for edges?
Do you attach your edges right before layup(i heard the base can warp)?
Might have more later...
1) really depends on what you're looking for. if you're trying for simplicity for your first core, use poplar or bamboo. they're kind of the jack of all trades woods. aside from that, common woods used by companies are ash, aspen, maple, pine, and the list goes on. I would recommend looking up a wood spec sheet and making your own combination of filler wood with some stiff/hard stringers for binding retention and flex. my favorite park skis last year were alder with ash and a little carbon.
2) mediopore tape is supposed to be the best. I used hockey tape.
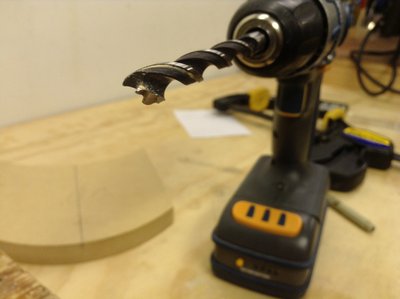
3) look up rabbetting bits
4) the biggest is making sure you connect them both at the same time, i've also heard the closer to layup the better, but i've done mine a day in advance and been fine
ALSO) all of these questions have been answered 10 times over on skibuilders, keep on reading!
Some nifty knowledge by experience from tonight. I've been running tight on time to get shit done, so I just decided to cut my bases straight off the roll tonight. I'm using my knife guides to cut the bases, I had been using a router for my first few pairs thought. As soon as I made the cuts and pulled the bases out they both had warped in opposite directions, basically making each ski base asymmetrical.
I had read about bases warping after being cut off the roll before over at the Ski Builders forums. This happens because of internal stresses in the p-tex. It's more prevalent with knife cutting than it is router cutting as I understand. Regardless of how you're cutting your bases it's still possible for it to happen.
How to prevent and eliminate it:
-Cut your blank sheet off of the p-tex roll and let it sit flat for a day before cutting your bases out of it.
-Use sharp, fresh knife blades or router bits.
-If they do come out warped, clamp the bases between your bench and template. Make sure you line the bases up underneath the template; use at least a clamp at each end and one in the middle. Let them sit like this for the night and they should be good to go. I let mine sit for just 10 minutes and they were back in alignment.
-This warping also goes hand in hand with attaching your edges at the same time. Make sure to check out your base alignment before attaching edges, then glue em on at the same time.
Do all that and you'll have some nice straight bases, and they will stay nice and true with edges on them.
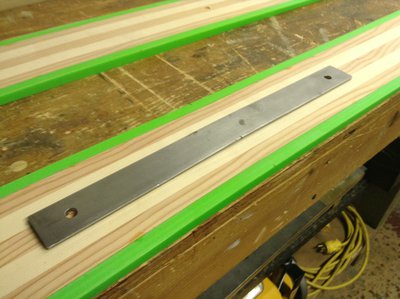
@CashmereCat, here's my little template for doing core pegs. It's just a steel strip with the holes spaced 30cm center to center, then the steel strip is marked for center both width wise and length wise. Just line it up on the core, then drill through with a good forstner/presicion bit. I've got grip tape on one side just to help keep it in place.
I don't have pictures of using it on the base yet, but to glue the pegs on, line the template up on the base, then just take your peg, glue them on through the holes of the template. Let the glue cure, then remove the template. Hope that helps!
ninetyfour how do you have prepared the sidewall for bonding? flame treatment+water drop test? I'm kinda sold on urethane (due to ease of use) but seems like uhmwpe has still better properties so I'm curious.
IlTeoninetyfour how do you have prepared the sidewall for bonding? flame treatment+water drop test? I'm kinda sold on urethane (due to ease of use) but seems like uhmwpe has still better properties so I'm curious.
This will be a wall of text so to answer your question in short; the top and bottom surfaces of the sidewall that will come into contact with glass in the layup, I give them a quick and even sanding with 100 grit, then a very brief flaming. The water is
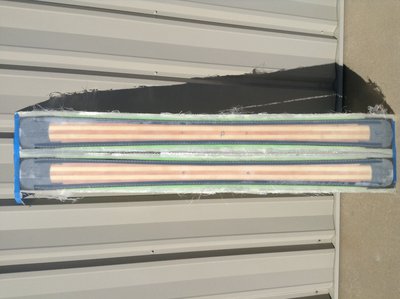
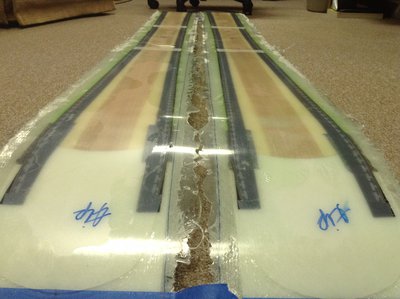
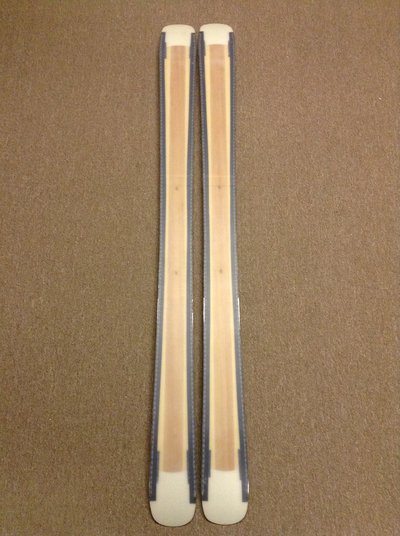
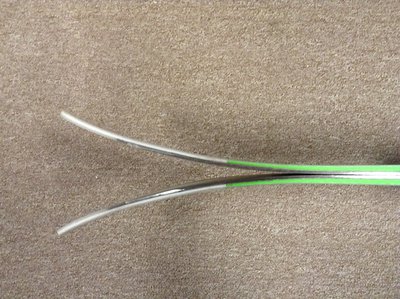
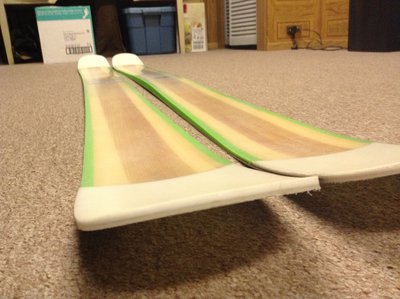
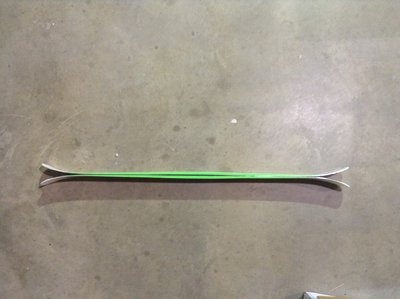
So, I did do my layup this weekend, and I'd kind of write this one off as a failure. Pictures of the layup post pressing:
Looks good from far...
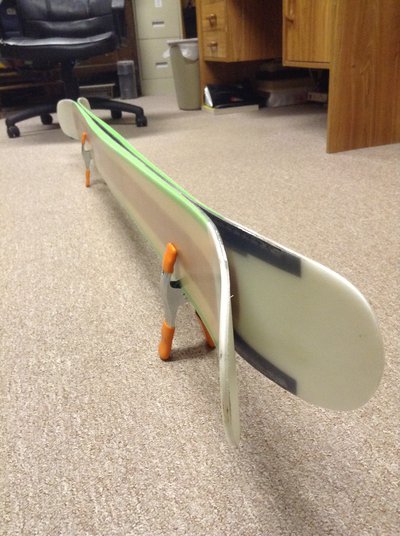
...but the bases look far from good...
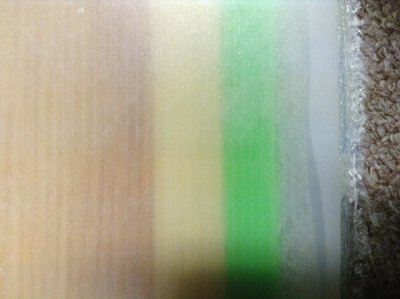
...and my neon green sidewalls look great, but they would look a whole lot better if they were sitting pretty with the core.
So my sidewalls popped off along considerable lengths of the core. As it sits now my process to attach them uses double sided carpet tape, and I had done some test pieces that were very promising. So I went ahead and and tried that method in this layup, but it just didn't work.
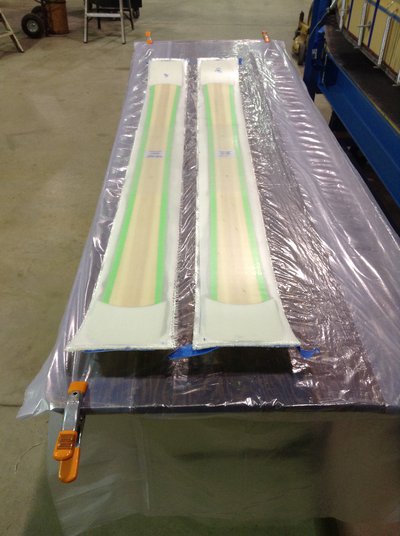
The bases are pretty dry in a few places, and I think it's a combination of over-scraping, and far too much press pressure. Most of the dry spots occur where layers meet and such, you can really see it on the tips and tails where the bases are, and I think it's causing too much squeeze out. My new moulds have given a lot more confinement to the bladder than my old moulds did, so my old 45psi pressure is likely far too high.
Possible solutions:
-Use a better adhesive. I'd like to avoid using anything with a long cure time though, immediate adhesion is really the best. I'm attaching sidewalls post profiling (which I can explain if you guys want me to) and this is easiest done with a quick setting adhesive.
-Check for gaps between sidewall and the core. Any kind of a small gap will be hydraulically formed into a bigger one by the pressure of the press and the epoxy. It's like a crack becoming a pothole with water freezing, etc...
-Ramp up the press pressure. For every layup I've ever done I'll admit to having a giant boner when it comes to getting pressure to the layup ASAP. I feel like if I ease the pressure on over the course of 5-10 minutes there will be more time for the epoxy to flow slowly over the sidewalls, instead of tsunami-ing them away.
-Heat curing. This kind of goes hand in hand with the last one, but a heat blanket would lock in the layup pretty quickly, giving the layup less of a chance to slide itself apart.
Oh, and I'm starting work on a pair of park skis ASAP to see if I can fix my problems by using the above solutions. Practice makes perfect. The core work, edging, and base work on the above skis was all on point. All of those things were less than spectacular before.
So my sidewalls popped off along considerable lengths of the core. As it sits now my process to attach them uses double sided carpet tape, and I had done some test pieces that were very promising. So I went ahead and and tried that method in this layup, but it just didn't work.
I know the feeling for sure man. Our old factory was directly across the street from Bron Tape in Salt Lake, and we struggled with all of their "permanent" tape for a while until we entirely just gave up on it. Obviously some companies have success with the tape like ON3P and Moment, but there are definitely some easy, and more confidence inspiring methods to attach your sidewalls. And it's hard to get a scale on the picture, but that doesn't seem like a total failure. Maybe bevel your sidewalls at a slightly steeper angle than usual and ride them. I always assumed some of the guys using floating sidewalls would have some gaps similar to that if we could see inside their skis.
The gap at its largest is 6mm and they all appear to be completely epoxy filled. I'll definitely be trimming them out and riding them, I'll just end up with a weird epoxy/UHMW hybrid sidewall.
As far as my reasoning for attaching with double sided tape goes, it all has to do with my core and sidewall profiling process.
Firstly I profile the cores to their final size. Then I stick the sidewalls down to the crib with double sided tape (that will be disposed, this is just to hold them down) and plane them to the same size as my cores. Then I make one more final pass taking 0.6mm off the sidewalls, this is the same depth as edge teeth thus creating my rabbet. When I attach the sidewalls to the core I flip the core and sidewalls upside down and then use a workbench to keep the top of the core flush with the top of my sidewalls while I'm attaching them. Once they're on, the rabbet is in place and the core and sidewall is flush on top.
It would be hard to stick them on post profiling with any kind of glue that has a long during time though.
I'll be honest, it took a long time to figure out how ON3P was attaching their sidewalls post core profiling and I think that's similar to how they do it. It's pretty smart for many reasons.
-If your sidewalls chip or snipe in the planer it's not a big deal because they're not permanently stuck to the core. Vise versa if your core gets damaged in the planer then no sidewalls are wasted.
-You can plane sidewalls easily in mass.
-You can easily sand and flame sidewalls if they're separate from the core.
-You don't need to use a rabbeting bit on your sidewalls.
-And if I can figure out how to use tape, it's quick, easy, and mess free. If I can't though it's a giant headache.
Really though, this is all part of the game, and I like flaking on the challenge. And luckily if I fail so bad with the process I'm using over and over, there are other tried and true methods I can resort to.
Kudos man! Sidewalls are, as we've discussed, an absolute bitch. However - When everything goes right, and I mean 100% right, it's such a beautiful ski. Only home builders come close to getting to taste the blood sweat and tears you endure building skis full time, and dealing with successes and failures. Gives you a while new appreciation and lens when it comes to the products out in the market.
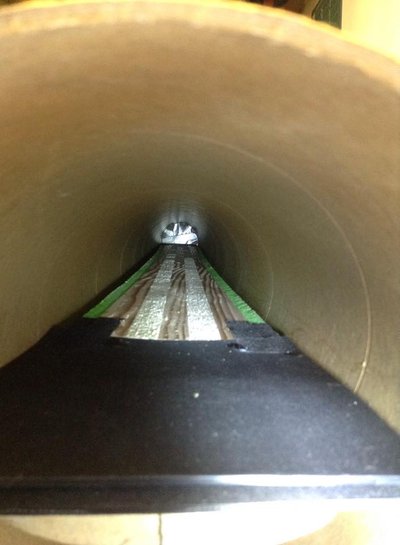
This is the bottom (base) side of my core and tipspacer and you can see the strips of hockey tape on the left and right side running across the joint.
The tape is about 2.5" long. After I've stuck the tape down, I run a few dabs of CA glue around the perimeter of the tape, just to make sure it won't come off during layup or pressing.
And if you're wondering why my cores are in a tube, It's a concrete form I'm using to transport the raw, and somewhat fragile materials from the house to the shop. Works like a giant blueprint case.
i just finished cutting out all my materials today i will post picks soon. i was wondering what you guys use to protect your base and topsheet during layup? i know 94 did that big tape testing thing awhile back but i seem to remember someone finding something better? i believe the problem was the tape wrinkled or the parallel peaces of tape were overlaying and left a dent?
anyways i am super stoked and i am just waiting for a good time to do the layup!
And I apply it with a wallpaper spreader. It takes some practice but it works. Just make sure your topsheet is clean before you apply it, if it isn't any debris will create an impression in your topsheet just like the tape I was using had done.
i just flexed my core and realised it may be too stiff, it is 5 pieces of mapel(the two mapel on either end are each about 1cm extra) and 4 of poplar each 2cm wide and 2.5mm at tip and tail and 12mm at center. i am using 19oz triaxle braded fiberglass. now the cores are about the flex i want right now but how much stiffer will the epoxy and fiberglass make it? i would asume quite abit?i am working at my highschool woodshop so there are atleast 60 people using the planer and i would probably need to wait till it was sharpened and i would need to turn the blade speed way down butdo you think i could still plane the 2.5mm ends more without them chipping?
94 when i look at the pictures of your skis after layup there isint tape ataching the tipspacers. i know the tape would obviously be unecisary at that point because the epoxy would hold the tip/tail spacers to the core, but do you take the tape off during layup? on skibuilders how to it says to use superglue, have you tried this or is there a reason not to use this method? sorry i am just still alittle bit confused and this was somthing i had overlooked originaly.
i still intend to rearead all of this thread and all of skibuilders howto and some of the threads on there when i have time so i may still have a few more questions.thanks for all the help!
joelskido you use it on the base too? if not what do you use on the base if anything? where did you get that stuff?
thanks
joelskii just flexed my core and realised it may be too stiff, it is 5 pieces of mapel(the two mapel on either end are each about 1cm extra) and 4 of poplar each 2cm wide and 2.5mm at tip and tail and 12mm at center. i am using 19oz triaxle braded fiberglass. now the cores are about the flex i want right now but how much stiffer will the epoxy and fiberglass make it? i would asume quite abit?i am working at my highschool woodshop so there are atleast 60 people using the planer and i would probably need to wait till it was sharpened and i would need to turn the blade speed way down butdo you think i could still plane the 2.5mm ends more without them chipping?
94 when i look at the pictures of your skis after layup there isint tape ataching the tipspacers. i know the tape would obviously be unecisary at that point because the epoxy would hold the tip/tail spacers to the core, but do you take the tape off during layup? on skibuilders how to it says to use superglue, have you tried this or is there a reason not to use this method? sorry i am just still alittle bit confused and this was somthing i had overlooked originaly.
i still intend to rearead all of this thread and all of skibuilders howto and some of the threads on there when i have time so i may still have a few more questions.thanks for all the help!
Yeah I mask my base and topsheets with it. It should be at Walmart in and around the kitchen and housewares departments. Ask someone for shelf liner if you need.
The cores will be quite a bit stiffer once they're glassed, not as stiff with 19oz. glass though. Honestly, 2.5-12-2.5 with that weight of glass sounds like it will be a reasonable flex. The only way they would end up overly stiff is if they were a really odd profile, with really short tapers and a big flatspot in the middle of the ski.
If you're super set on planing them though, as long as the planer is sharp and you're really careful you should be able to take more off.
The tape, it stays inside the layup. I really don't know how else to explain it. It's just a few pieces of hockey tape that sticks the tipspacer and core together.
So I did a layup yesterday and just pulled the skis out of the press. Turned out great. Sidewalls look like they stuck really well, I used 3M double sided "outdoor" carpet tape, then I did a slow inflation and only used 32psi down from 45psi in the bladder. I'll get some pictures of the raw layup posted tonight.
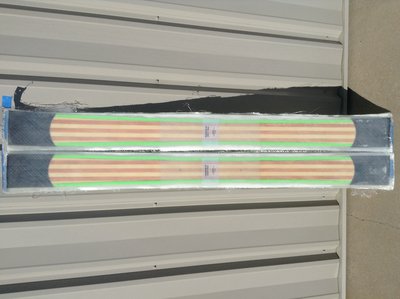
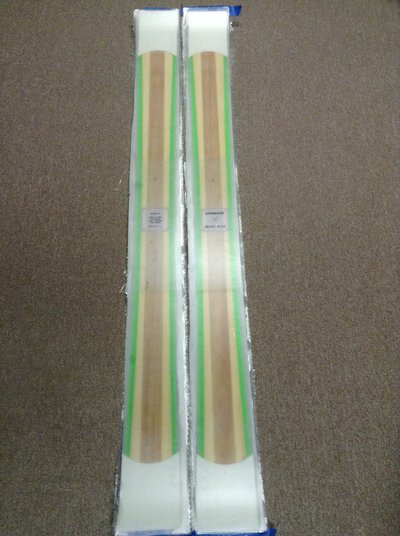
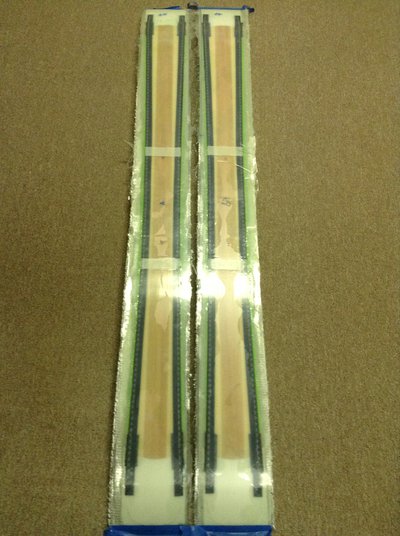
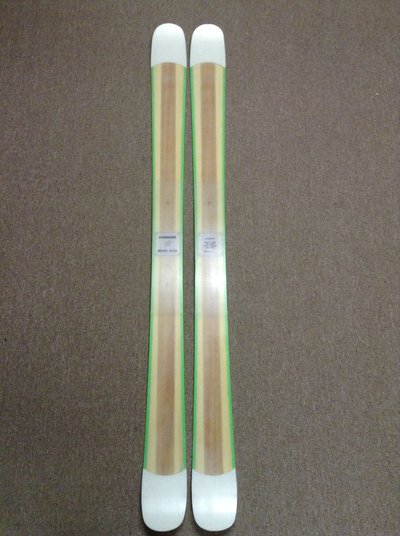
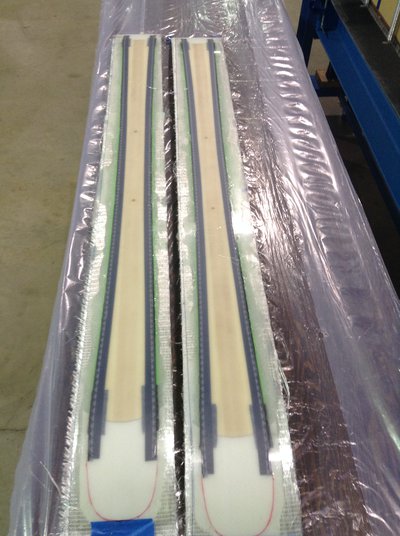
So here's some pictures of the raw layup. They may look a tad shitty because I still have the mask on, and it's also covered in some PVA that transferred from the cassettes, especially the base.
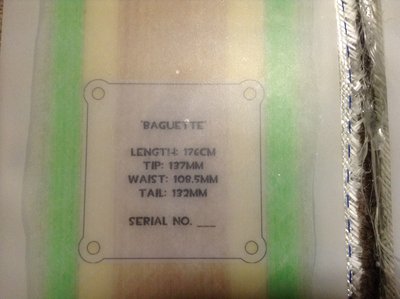
Switched up my tags. Previously I had some lame ones that were identical. Now I've gone to one with my name on it, and the other is the ski name, shape specs, and serial which will be stamped into the topsheet and then inked.
There's a few portions along the sidewall where there's a slight gap, but they're all hairlines at most. The rest of the sidewall is extremely tight to the core. The other thing that could use a bit of work is where the ends of my tipspacer tapes and edge tapes are. I'd love them all to be super flush. Those will improve with more building time.
I'll get more pictures up when there finished. They need to post-cure for a few days before I'll send them through the saw though.
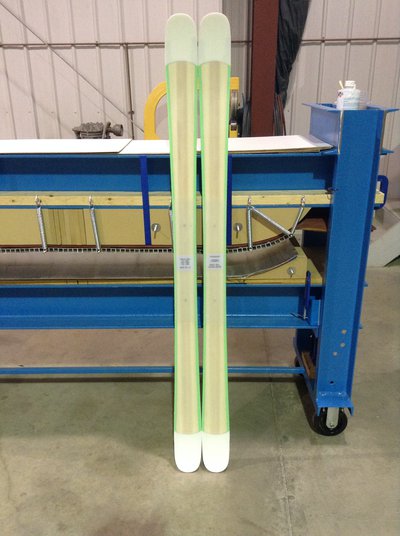
Pictures kind of suck, but I can't take them outside anymore as it's around -15C, so the basement storage room will have to do.
The skis themselves turned out pretty awesome. I'd put them on par with most mass manufactured stuff in terms of quality. The shape will be really fun as it's just a fat park ski. The new tip and tail profile holds the same 55mm splay that my old tip profiles used to have, but it is so much more mellow which creates a drastically different tip angle. The best part about it is the reduced stress on the edges and the joint between the tipspacer and core though which is awesome. I think it will float quite well to, it just may be a hair scarier for nollies. And sidewalls that worked to cap it all off, I'm enthusiastic about those!
Going to get some serious work done tomorrow on a set of park killers I'm building for my buddy. Hopefully they turn out just as nice!
Although you seem to have solved your issues related to layup cure speed and whatever, I'm fairly certain the addition of some HCl to your resin mixture will help things along. Epoxy, no idea what that'll do to poly or something else. Probably nothing good. I know the company who makes the surfboard resin I use sells an accelerator, and it's just HCl in an alcohol or something (so says the msds).
Also, you ever hear of people putting propylene glycol, or some type of epoxidized elasotomeric molecules solvated in prop glycol into their resin, to make it more elastic? Apparently such products exist. Somebody was talking about it for surfboards, and I wonder if that'll help. Although I'd imagine ski resin is already formulated to be flexible so this would be a non issue. Just random thoughts.
Hmm, I've never heard of hydrochloric acid being mixed into epoxy before, but like you said I've probably only ever seen it under some kind of accelerator namesake. As far as accelerating cures goes, I'm looking to maintain the 45-ish minute gel time on the epoxy I'm working with now, I really do need that kind of time.
And the flexible resins. Haven't heard of additives for epoxy either, I have for polyester resin though, and we use them at work all the time. It works really well, but what is created in flexibility is lost in stiffness. It might work better for a pair of skis though, because you have 2 shear layers of glass separated by the core trying to bend at different rates, and that creates a lot of a ski's stiffness. If I get the chance I'll have to try a polyester/flex resin ski layup sometime.
LoafRiderJust finished my new pair , the Street Smarts.
Length 180
Specs 114/86/112
Full ash wood core no tip spacers, with oak sidewalls and poplar veneer bases.
Sorry if you've answered this before and I've missed it but are you using wood veneer instead of p-tex base material? If so how durable and fast do they run?
My second pair have been dragging with work and life admin. Got my cores profiled after a mishap with taking the wrong model to the Cnc resulting in a ruined set of sidewalls. Core was salvageable but a mistake I won't make again. Should be getting the base material for them this week and then some time soon going to try my hand at some laser etching on my beautiful rosewood veneers for the topsheet. Then it's the long panic of the layup
Yeah, those bases are something else man. Did you use a veneer or multiple veneers thick enough to accommodate edges? I think I see edges in the pictures but maybe I'm crazy. A pretty cool take on ski building.
razors-chazSorry if you've answered this before and I've missed it but are you using wood veneer instead of p-tex base material? If so how durable and fast do they run?
Yup wood veneer, not to sure how they will hold up this is my first pair with a base like this. They should be fast using some pretty good and durable stain that holds hot wax.
NinetyFourYeah, those bases are something else man. Did you use a veneer or multiple veneers thick enough to accommodate edges? I think I see edges in the pictures but maybe I'm crazy. A pretty cool take on ski building.
Nope just one veneer that is the same thickness of a plastic base, and yes the skis have edges.
LoafRiderYup wood veneer, not to sure how they will hold up this is my first pair with a base like this. They should be fast using some pretty good and durable stain that holds hot wax.
Nope just one veneer that is the same thickness of a plastic base, and yes the skis have edges.
did you read the thread on SB with the guy that used wood bases? any combination of wax he tried would usually ski off in 2-3 runs. I hope it works out for you, but from what i've read you've got a battle ahead. lot of good info in that thread though, I wish I could remember who it was.
loganimlachdid you read the thread on SB with the guy that used wood bases? any combination of wax he tried would usually ski off in 2-3 runs. I hope it works out for you, but from what i've read you've got a battle ahead. lot of good info in that thread though, I wish I could remember who it was.
That was skidesmond on sb , talked to him about and got the vibe he really just wanted to make them and not ski them. I have also talked to the guy that owns this company http://www.powderjets.com and got some tips from him, as well the guy that owns snurfer boards. I'm kind of using a little of both tips from both companies and it should work out just fine, at least I hope it does.
LoafRiderThat was skidesmond on sb , talked to him about and got the vibe he really just wanted to make them and not ski them. I have also talked to the guy that owns this company http://www.powderjets.com and got some tips from him, as well the guy that owns snurfer boards. I'm kind of using a little of both tips from both companies and it should work out just fine, at least I hope it does.
fuck yeah man, well i can't wait to hear how they work!
LoafRiderThat was skidesmond on sb , talked to him about and got the vibe he really just wanted to make them and not ski them. I have also talked to the guy that owns this company http://www.powderjets.com and got some tips from him, as well the guy that owns snurfer boards. I'm kind of using a little of both tips from both companies and it should work out just fine, at least I hope it does.
i guess the reason I saw issues was that both of those companies appear 100% powder oriented and your dimensions are more geared towards a park ski. out of curiosity, whats your plan? I understand if you don't want to share
loganimlachi guess the reason I saw issues was that both of those companies appear 100% powder oriented and your dimensions are more geared towards a park ski. out of curiosity, whats your plan? I understand if you don't want to share
Powder jet does make a resort board but yeah they focus on powder. My plan is just to make a park ski with a wood base and see how it goes, always wanted to try it so I made a pair to make it happen.
LoafRiderPowder jet does make a resort board but yeah they focus on powder. My plan is just to make a park ski with a wood base and see how it goes, always wanted to try it so I made a pair to make it happen.
i understand completely, and i think that it's awesome. i meant your plan as far as poly and waxing, i'm just way curious. did your bases get saturated with epoxy during the layup? I was always wondering if you started with relatively dry veneer bases then completely saturated them with wax that it wouldn't ski off, or it would take a long time to
loganimlachi understand completely, and i think that it's awesome. i meant your plan as far as poly and waxing, i'm just way curious. did your bases get saturated with epoxy during the layup? I was always wondering if you started with relatively dry veneer bases then completely saturated them with wax that it wouldn't ski off, or it would take a long time to
No saturation at all the veneer is 1/18" thick so it doesn't soak through, the base are dry and clean.
Plan A is to use spar on the bases and hot wax them like a normal ski. Which I hope to get done today.
Plan B if the spar doesn't work I'm going to sand it off and use epoxy with hot wax.
Finished up a pair tonight for a buddy. Just a symmetrical park ski with a medium flex. They don't look quite symmetrical in the pictures, my iPad made the whole images look kind of distorted though. The actual symmetry and measurements (116/90/116 @176 true) are on point.
They turned out really well, the wet out is great, the sidewalls or VDS didn't shift, and I only used 800G of epoxy for these. Can't wait to see what he can do on them.
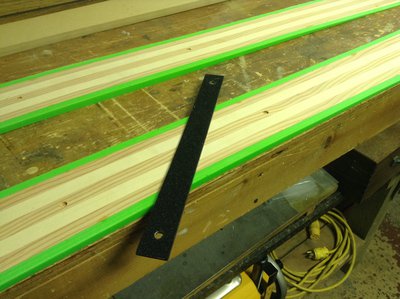
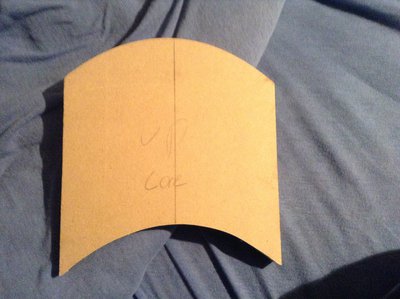
Aha thanks guys. As far as the core and spacer joints go this is the template I use. Handmade which is likely the reason why if I use one side for the core, and the other for the spacer I get a tighter joint. Again it looks really distorted to me in the picture...
I have to use clamps to secure it right now which sucks, so I'm going to make a new one which has it's own form of clamp. That way it will be quicker and more precise. If that works well, I may see if I can get a CNC'd aluminium one for like laser precise joints. That would be really cool.
NinetyFourFinished up a pair tonight for a buddy. Just a symmetrical park ski with a medium flex. They don't look quite symmetrical in the pictures, my iPad made the whole images look kind of distorted though. The actual symmetry and measurements (116/90/116 @176 true) are on point.
They turned out really well, the wet out is great, the sidewalls or VDS didn't shift, and I only used 800G of epoxy for these. Can't wait to see what he can do on them.
how much total have you put into making those skis
Pictures kind of suck, but I can't take them outside anymore as it's around -15C, so the basement storage room will have to do.
The skis themselves turned out pretty awesome. I'd put them on par with most mass manufactured stuff in terms of quality. The shape will be really fun as it's just a fat park ski. The new tip and tail profile holds the same 55mm splay that my old tip profiles used to have, but it is so much more mellow which creates a drastically different tip angle. The best part about it is the reduced stress on the edges and the joint between the tipspacer and core though which is awesome. I think it will float quite well to, it just may be a hair scarier for nollies. And sidewalls that worked to cap it all off, I'm enthusiastic about those!
Going to get some serious work done tomorrow on a set of park killers I'm building for my buddy. Hopefully they turn out just as nice!
those look absolutely amazing! how long does it take you now to completely make a pair? also i see now where the tape attaching the tip spacers is in those it was covered up by the vds in the other ones and thats why i was confused